写在前面
参考书籍
Aston Zhang, Zachary C. Lipton, Mu Li, Alexander J. Smola. Dive into Deep Learning. 2020.
简介 - Dive-into-DL-PyTorch (tangshusen.me)
多层感知机
source code: NJU-ymhui/DeepLearning: Deep Learning with pytorch (github.com)
use git to clone: https://github.com/NJU-ymhui/DeepLearning.git
/MLP
mlp.py mlp_self.py mlp_lib.py polynomial.py high_dim.py dropout_self.py dropout_lib.py
为什么需要非线性模型
因为线性模型可能出错,线性即意味着做出了单调性假设,但现实世界并不总是满足单调性的,即使满足单调性,也不一定是线性变化的。
例如,我们想要根据体温预测死亡率。对体温高于37摄氏度的人来说,温度越高风险越大;然而,对体温低于37摄氏度的人来说,温度越高风险就越低。在这种情况下,或许还可以通过一些预处理解决问题,比如以37摄氏度为切入点,以温差为特征。
但如果是在处理图像呢?假设我们以像素点的强度来区分A和B,那么一个像素点的增强是否一定意味着似然性的加强呢?这个像素点的强度又是否有明确的转折点呢?反转一张图像,图片类别不变,然而单个像素点的强度可能会发生天翻地覆的变化…在这样一个世界中,只用线性方法注定会失败。
加入隐藏层
首先看一张多层感知机的示意图
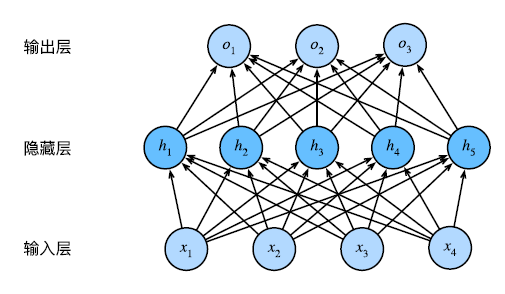
输入层即为我们输入样本的地方(features), 输出层即为产生结果的地方(labels)。
这个多层感知机有4个输入,3个输出,其隐藏层包含5个隐藏单元。输入层不涉及任何计算,因此使用此网络产生输出只需要实现隐藏层和输出层的计算。因此,这个多层感知机中的层数为2。注意,这两个层都是全连接的(即相邻层之间的任意两个神经元互相连接)。每个输入都会影响隐藏层中的每个神经元,而隐藏层中的每个神经元又会影响输出层中的每个神经元。
注:全连接的开销比较大,设一层有p个神经元,一层有q个神经元,则全连接的开销就是O(pq)
从线性到非线性
和之前一样,我们仍使用一个矩阵**X~nd~**来表示n个样本的小批量。理论部分详见5.1. Multilayer Perceptrons — Dive into Deep Learning 1.0.3 documentation (d2l.ai)
激活函数
激活函数通过计算加权和并加上偏置来确定神经元是否应该被激活,它们将输入信号转换为输出的可微运算。大多数激活函数都是非线性的。下面介绍一些常见的激活函数。
ReLU函数
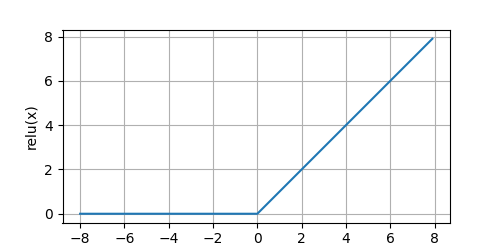
通俗地说,ReLU函数通过将相应的活性值设为0,仅保留正元素并丢弃所有负元素。我们可视化一下
code
def relu():
x = torch.arange(-8.0, 8.0, 0.1, requires_grad=True)
y = torch.relu(x)
d2l.plot(x.detach(), y.detach(), 'x', 'relu(x)', figsize=(5, 2.5))
d2l.plt.show()
|
output
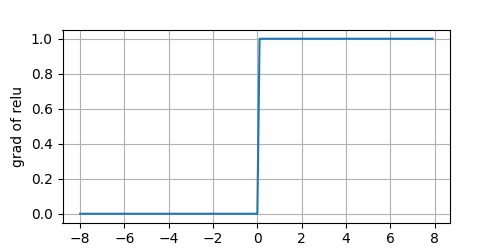
再看一下导数
code
y.backward(torch.ones_like(x), retain_graph=True)
d2l.plot(x.detach(), x.grad, 'x', 'grad of relu', figsize=(5, 2.5))
d2l.plt.show()
|
output
sigmoid函数

code
def sigmoid():
x = torch.arange(-8.0, 8.0, 0.1, requires_grad=True)
y = torch.sigmoid(x)
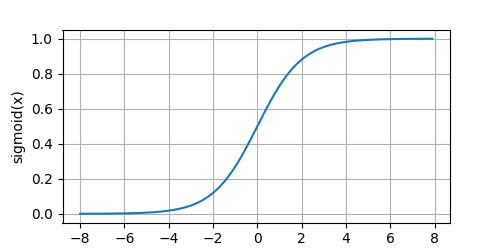
d2l.plot(x.detach(), y.detach(), 'x', 'sigmoid(x)', figsize=(5, 2.5))
d2l.plt.show()
y.backward(torch.ones_like(x), retain_graph=True)
d2l.plot(x.detach(), x.grad, 'x', 'grad of sigmoid', figsize=(5, 2.5))
d2l.plt.show()
|
output
sigmoid原函数
sigmoid导函数

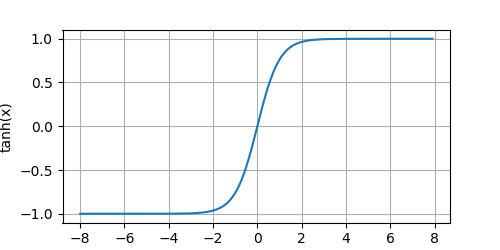
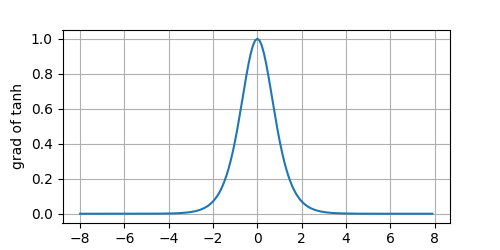
tanh函数

code
def tanh():
x = torch.arange(-8.0, 8.0, 0.1, requires_grad=True)
y = torch.tanh(x)
d2l.plot(x.detach(), y.detach(), 'x', 'tanh(x)', figsize=(5, 2.5))
d2l.plt.show()
y.backward(torch.ones_like(x), retain_graph=True)
d2l.plot(x.detach(), x.grad, 'x', 'grad of tanh', figsize=(5, 2.5))
d2l.plt.show()
|
output
tanh原函数
tanh导函数
恭喜你已经了解了多层感知机的所有知识,现在自己动手实现一个吧!
从0?开始实现多层感知机
code
import torch
from matplotlib import pyplot as plt
from d2l import torch as d2l
from torch import nn
"""从零开始写一个多层感知机"""
number_inputs, number_outputs, number_hidden = 28 * 28, 10, 256
def relu(x):
"""relu激活函数"""
zero = torch.zeros_like(x)
return torch.max(x, zero)
if __name__ == '__main__':
plt.switch_backend('Agg')
batch_size = 256
train_iter, test_iter = d2l.load_data_fashion_mnist(batch_size)
w1 = nn.Parameter(torch.randn(number_inputs, number_hidden, requires_grad=True) * 0.01)
b1 = nn.Parameter(torch.zeros(number_hidden, requires_grad=True))
w2 = nn.Parameter(torch.randn(number_hidden, number_outputs, requires_grad=True) * 0.01)
b2 = nn.Parameter(torch.zeros(number_outputs, requires_grad=True))
params = [w1, b1, w2, b2]
def net(x):
"""定义模型"""
x = x.reshape((-1, number_inputs))
hidden = relu(x @ w1 + b1)
return hidden @ w2 + b2
loss = nn.CrossEntropyLoss(reduction='none')
num_epochs, lr = 10, 0.1
updator = torch.optim.SGD(params, lr=lr)
d2l.train_ch3(net, train_iter, test_iter, loss, num_epochs, updator)
d2l.predict_ch3(net, test_iter)
|
output
环境原因尚未看到图片输出
可以先参考5.2. Implementation of Multilayer Perceptrons — Dive into Deep Learning 1.0.3 documentation (d2l.ai)
多层感知机的简洁实现
直接使用现有框架实现多层感知机
code
from d2l import torch as d2l
import torch
from torch import nn
def init_weights(m):
"""
初始化神经网络模型中的权重
:param m: 传入模块
"""
if type(m) == nn.Linear:
nn.init.normal_(m.weight, std=0.01)
if __name__ == '__main__':
batch_size = 256
train_iter, test_iter = d2l.load_data_fashion_mnist(batch_size)
net = nn.Sequential(
nn.Flatten(),
nn.Linear(784, 256),
nn.ReLU(),
nn.Linear(256, 10)
)
loss = nn.CrossEntropyLoss(reduction='none')
num_epochs, lr = 10, 0.1
trainer = torch.optim.SGD(net.parameters(), lr=lr)
d2l.train_ch3(net, train_iter, test_iter, loss, num_epochs, trainer)
|
环境原因尚未看到图片输出
拟合过程中的问题
模型选择
字面意思,选择拟合效果最好的模型;但这又引出了新问题,该如何验证比较呢?
验证集
原则上,在我们确定所有的超参数之前,我们不希望用到测试集。如果我们在模型选择过程中使用测试数据,可能会有过拟合测试数据的风险,那就麻烦大了。
然而,我们也不能仅仅依靠训练数据来选择模型,因为我们无法估计训练数据的泛化误差;这时就需要一个验证集。
常见做法是将我们的数据分成三份,除了训练和测试数据集之外,还增加一个验证数据集,也叫验证集,不过现实中验证集和测试集的边界相当模糊,在我们的学习过程中,凡是涉及所谓预测精确度的地方,除非明确说明,使用的都是验证集(也就是我们划分的其实是训练集和验证集,并不提供测试集)
K折交叉验证
当训练数据稀缺时,我们甚至可能无法提供足够的数据来构成一个合适的验证集。这个问题的一个流行的解决方案是采用K折交叉验证。这里,原始训练数据被分成K个不重叠的子集。然后执行K次模型训练和验证,每次在K − 1个子集上进行训练,并在剩余的一个子集(在该轮中没有用于训练的子集)上进行验证。最后,通过对K次实验的结果取平均来估计训练和验证误差。
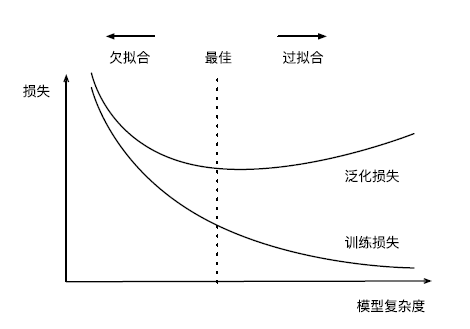
欠拟合
当模型过于简单,表达能力不足,学习到的特征过少以至于来了一个在某方面有相似的样本就被接纳了,这种现象称为欠拟合。
欠拟合的训练误差和验证误差都很大,但它们两者本身差距不大
过拟合
将模型在训练数据上拟合得比在潜在分布中更接近的现象称为过拟合,说人话就是模型在训练集上达到了近乎完美的水平,而在测试集上误差却比较大。
比如当模型复杂度过高时,它记住了过多的样本的特征,然而其中有些是不那么必要的,以至于只要不满足特征的样本就被排斥在外了。
过拟合的训练误差很小,但验证误差很大,即训练误差 << 验证误差,此时要小心过拟合
模型复杂性
数据集大小
训练数据的样本越少,越容易发生过拟合;随着训练数据量提升,泛化误差通常会减小。给出更多的数据,我们会尝试拟合一个更复杂的模型,而当数据较少时,简单的模型可能更有效。需要认识到,只有当训练数据量达到数千时,深度学习才会优于线性模型。
多项式回归
我们尝试拟合这样一个多项式(用标准式生成数据,再用数据拟合模型)

通过这样一个例子来了解欠拟合和过拟合的实际情况
code
import math
import torch
import random
import numpy as np
from torch import nn
from d2l import torch as d2l
def evaluate_loss(net, data_iter, loss):
"""评估给定数据集上的模型损失"""
metric = d2l.Accumulator(2)
for X, y in data_iter:
out = net(X)
y = y.reshape(out.shape)
l = loss(out, y)
metric.add(l.sum(), y.numel())
return metric[0] / metric[1]
def train(train_features, test_features, train_labels, test_labels, num_epochs=400):
"""
:param train_features:
:param test_features:
:param train_labels:
:param test_labels:
:param num_epochs:
:return:
"""
loss = nn.MSELoss(reduction='none')
input_shape = train_features.shape[-1]
net = nn.Sequential(nn.Linear(input_shape, 1, bias=False))
batch_size = min(10, train_labels.shape[0])
train_iter = d2l.load_array((train_features, train_labels.reshape(-1, 1)), batch_size)
test_iter = d2l.load_array((test_features, test_labels.reshape(-1, 1)), batch_size, is_train=False)
trainer = torch.optim.SGD(net.parameters(), lr=0.01)
animation = d2l.Animator(xlabel='epoch', ylabel='loss', yscale='log', xlim=[1, num_epochs], ylim=[1e-3, 1e2],
legend=['train', 'test'])
for epoch in range(num_epochs):
d2l.train_epoch_ch3(net, train_iter, loss, trainer)
if epoch == 0 or (epoch + 1) % 20 == 0:
animation.add(epoch + 1, (evaluate_loss(net, train_iter, loss), evaluate_loss(net, test_iter, loss)))
print("weight:")
print(net[0].weight.data.numpy())
return net[0].weight.data
if __name__ == '__main__':
max_degree = 20
n_train, n_test = 100, 100
true_w = torch.zeros(max_degree)
true_w[0:4] = torch.tensor([5, 1.2, -3.4, 5.6])
features = torch.randn((n_train + n_test, 1))
random_indices = torch.randperm(n_train + n_test)
features = features[random_indices]
poly_features = torch.pow(features, torch.arange(max_degree).reshape(1, -1))
for i in range(max_degree):
poly_features[:, i] /= math.gamma(i + 1)
labels = torch.mm(poly_features, true_w.reshape(-1, 1))
labels += torch.normal(0, 0.1, labels.shape)
print("data slices:")
print(features[:2])
print(poly_features[:2, :])
print(labels[:2])
predict_w = train(poly_features[:n_train, :4], poly_features[n_test:, :4], labels[:n_train], labels[n_test:])
print('correct mistake:')
print(predict_w - true_w[:4])
predict_w = train(poly_features[:n_train, :2], poly_features[n_test:, :2], labels[:n_train], labels[n_test:])
print('linear mistake:')
print(predict_w - true_w[:2])
predict_w = train(poly_features[:n_train, :8], poly_features[n_test:, :8], labels[:n_train], labels[n_test:])
print('overfit mistake:')
print(predict_w - true_w[:8])
predict_w = train(poly_features[:n_train, :], poly_features[n_test:, :], labels[:n_train], labels[n_test:])
print('all mistake:')
print(predict_w - true_w)
|
output
正常
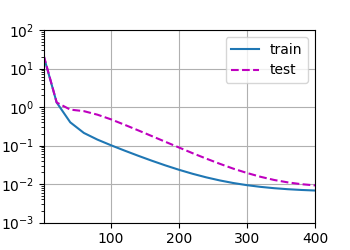
weight:
[[ 5.010181   1.2250326 -3.421302   5.54533  ]]
correct mistake:
tensor([[ 0.0102,  0.0250, -0.0213, -0.0547]])
|
欠拟合
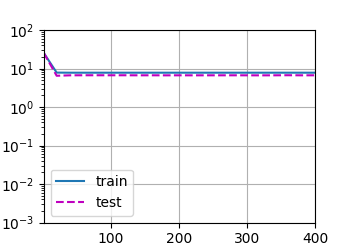
weight:
[[3.5309384 4.0524364]]
linear mistake:
tensor([[-1.4691,  2.8524]])
|
两种过拟合
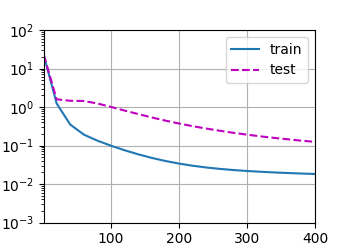
weight:
[[ 4.937372    1.3379664  -3.0077322   5.0077944  -1.2465584   1.0296985
  -0.5775194  -0.10814942]]
overfit mistake:
tensor([[-0.0626,  0.1380,  0.3923, -0.5922, -1.2466,  1.0297, -0.5775, -0.1081]])
|
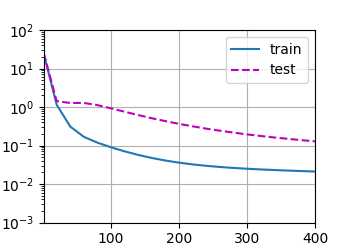
weight:
[[ 4.9291635   1.3562328  -2.958946    4.904419   -1.4154936   1.2838099
  -0.36761254  0.3409793  -0.16273078 -0.04508495 -0.09691837  0.2131685
   0.18586184 -0.18636724 -0.20589598 -0.01916531  0.06223011  0.0851168
   0.1374422   0.13517812]]
all mistake:
tensor([[-0.0708,  0.1562,  0.4411, -0.6956, -1.4155,  1.2838, -0.3676,  0.3410,
         -0.1627, -0.0451, -0.0969,  0.2132,  0.1859, -0.1864, -0.2059, -0.0192,
          0.0622,  0.0851,  0.1374,  0.1352]])
|
缓解过拟合问题的方法
权重衰减
为了解决过拟合问题,引入一些正则化模型的技术。
权重衰减是最广泛使用的正则化技术之一,也被称为L2正则化。这项技术通过衡量函数与零的距离来判断模型复杂度
一个高维线性回归的例子
我们尝试拟合这样一个函数

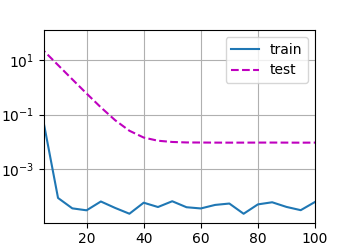
为了尽可能地体现出过拟合,假设样本共有200个特征(200维),数据集是只有20个样本的小样本
code
import torch
from torch import nn
from d2l import torch as d2l
"""
使用正则化技术缓解过拟合
模型具有200维,使用只包含20个样本的小样本
"""
def init_params(number_features):
"""
随机初始化模型参数
:return:
"""
w = torch.normal(0, 1, (number_features, 1), requires_grad=True)
b = torch.zeros(1, requires_grad=True)
return [w, b]
def l2_penalty(w):
"""
定义L2范数惩罚
:param w: 权重向量
:return:
"""
return w.pow(2).sum() / 2
def train(num_features, train_iter, test_iter, batch_size, regular=0):
"""
:param regular: 正则系数
:return: 拟合后的权重与偏移
"""
num_epochs, lr = 100, 0.03
w, b = init_params(num_features)
net = lambda x: d2l.linreg(x, w, b)
loss = d2l.squared_loss
animator = d2l.Animator(xlabel='epochs', ylabel='loss', yscale='log', xlim=[5, num_epochs],
legend=['train', 'test'])
for epoch in range(num_epochs):
for x, y in train_iter:
l = loss(net(x), y) + regular * l2_penalty(w)
l.sum().backward()
d2l.sgd([w, b], lr, batch_size=batch_size)
if epoch == 0 or (epoch + 1) % 5 == 0:
animator.add(epoch + 1, (d2l.evaluate_loss(net, train_iter, loss),
d2l.evaluate_loss(net, test_iter, loss)))
print('weight:')
print(w.data[:5].numpy())
print('bias:')
print(b.data.numpy())
print('L2:')
print(torch.norm(w).item())
return w.data, b.data
if __name__ == '__main__':
n_train, n_test = 20, 100
num_inputs = 200
batch_size = 5
true_w = torch.ones((num_inputs, 1)) * 0.01
true_b = 0.05
print('true_w:')
print(true_w[:10])
print('true_b:')
print(true_b)
train_data = d2l.synthetic_data(true_w, true_b, n_train)
train_iter = d2l.load_array(train_data, batch_size=batch_size)
test_data = d2l.synthetic_data(true_w, true_b, n_test)
test_iter = d2l.load_array(test_data, batch_size=batch_size, is_train=False)
print('----------no regularization----------')
pred_w, pred_b = train(num_inputs, train_iter, test_iter, batch_size, regular=0)
print('pred_w - true_w:')
print(pred_w[:5] - true_w[:5])
print('pred_b - true_b:')
print(pred_b - true_b)
d2l.plt.show()
print('----------with regularization----------')
pred_w, pred_b = train(num_inputs, train_iter, test_iter, batch_size, regular=3)
print('pred_w - true_w:')
print(pred_w[:5] - true_w[:5])
print('pred_b - true_b:')
print(pred_b - true_b)
d2l.plt.show()
|
output
true_w:
tensor([[0.0100],
        [0.0100],
        [0.0100],
        [0.0100],
        [0.0100],
        [0.0100],
        [0.0100],
        [0.0100],
        [0.0100],
        [0.0100]])
true_b:
0.05
----------no regularization----------
weight:
[[-0.3840736 ]
 [ 1.1716033 ]
 [ 0.5462728 ]
 [ 0.55637556]
 [ 0.4533415 ]]
bias:
[0.0539746]
L2:
13.647695541381836
pred_w - true_w:
tensor([[-0.3941],
        [ 1.1616],
        [ 0.5363],
        [ 0.5464],
        [ 0.4433]])
pred_b - true_b:
tensor([0.0040])
----------with regularization----------
weight:
[[-2.0754803e-03]
 [ 4.0748098e-04]
 [ 3.2745302e-06]
 [ 1.6372477e-03]
 [ 4.4756951e-03]]
bias:
[0.03499107]
L2:
0.036297813057899475
pred_w - true_w:
tensor([[-0.0121],
        [-0.0096],
        [-0.0100],
        [-0.0084],
        [-0.0055]])
pred_b - true_b:
tensor([-0.0150])
|
不开正则化
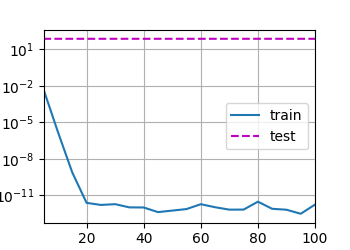
开正则化
暂退法
偏差-方差平衡
偏差指的是预测值与实际值之间的差距,方差是指多次预测结果之间的差距。两者可能同时大,但不太可能同时小。对于线性模型而言,拟合较好的会偏向偏差一侧,而方差较小,因为他们只能表示一小类函数,不容易考虑特征之间的相互作用,因而在不同的随机数据样本上可以得出相似的结果;神经网络则刚好相反,偏向于方差一侧,而偏差较小,它们不局限于查看单个特征,而是擅长挖掘特征之间潜在的联系,但这也导致了较高的过拟合风险,可能会依赖一些虚假关联。
当面对更多的特征而样本不足时,线性模型往往会过拟合;当给出更多样本而不是特征,通常线性模型不会过拟合,这是以牺牲学习特征之间的交互换来的。
不过不幸的是,即使我们有比特征多得多的样本,深度神经网络也有可能过拟合
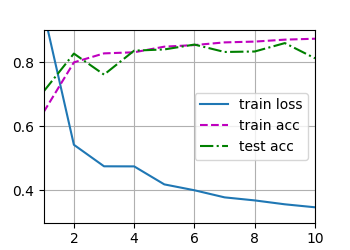
从0实现暂退法
code
import torch
from torch import nn
from d2l import torch as d2l
"""从零实现暂退法"""
def dropout_layer(X, drop_prob):
"""
在隐藏层应用暂退法,用于神经网络训练中防止过拟合
该函数以dropout的概率丢弃张量输入X中的元素,重新缩放剩余部分即除以 1 - dropout
:param X: 张量输入
:param drop_prob: 概率
:return: 丢弃、放缩后的结果
"""
assert 0 <= drop_prob <= 1
if drop_prob == 1:
return torch.zeros_like(X)
mask = (torch.rand(X.shape) > drop_prob).float()
return mask * X / (1 - drop_prob)
drop_out1, drop_out2 = 0.2, 0.5
class Net(nn.Module):
"""实现一个两层感知机"""
def __init__(self, num_inputs, num_outputs, num_hiddens1, num_hiddens2, is_training=True):
super(Net, self).__init__()
self.num_inputs = num_inputs
self.training = is_training
self.lin1 = nn.Linear(num_inputs, num_hiddens1)
self.lin2 = nn.Linear(num_hiddens1, num_hiddens2)
self.lin3 = nn.Linear(num_hiddens2, num_outputs)
self.relu = nn.ReLU()
def forward(self, X):
H1 = self.relu(self.lin1(X.reshape((-1, self.num_inputs))))
if self.training:
H1 = dropout_layer(H1, drop_out1)
H2 = self.relu(self.lin2(H1))
if self.training:
H2 = dropout_layer(H2, drop_out2)
output = self.lin3(H2)
return output
if __name__ == '__main__':
A = torch.arange(25).reshape(5, 5)
print('before:')
print(A)
print('after:')
print(dropout_layer(A, 0))
print(dropout_layer(A, 0.5))
print(dropout_layer(A, 1))
num_inputs, num_outputs, num_hiddens1, num_hiddens2 = 784, 10, 256, 256
net = Net(num_inputs, num_outputs, num_hiddens1, num_hiddens2)
num_epochs, lr, batch_size = 10, 0.5, 256
loss = nn.CrossEntropyLoss(reduction='none')
train_iter, test_iter = d2l.load_data_fashion_mnist(batch_size)
trainer = torch.optim.SGD(net.parameters(), lr=lr)
d2l.train_ch3(net, train_iter, test_iter, loss, num_epochs, trainer)
d2l.plt.show()
|
output
before:
tensor([[ 0,  1,  2,  3,  4],
        [ 5,  6,  7,  8,  9],
        [10, 11, 12, 13, 14],
        [15, 16, 17, 18, 19],
        [20, 21, 22, 23, 24]])
after:
tensor([[ 0.,  1.,  2.,  3.,  4.],
        [ 5.,  6.,  7.,  8.,  9.],
        [10., 11., 12., 13., 14.],
        [15., 16., 17., 18., 19.],
        [20., 21., 22., 23., 24.]])
tensor([[ 0.,  2.,  4.,  0.,  0.],
        [10.,  0., 14., 16., 18.],
        [ 0.,  0.,  0.,  0., 28.],
        [ 0., 32.,  0.,  0., 38.],
        [ 0.,  0., 44.,  0.,  0.]])
tensor([[0, 0, 0, 0, 0],
        [0, 0, 0, 0, 0],
        [0, 0, 0, 0, 0],
        [0, 0, 0, 0, 0],
        [0, 0, 0, 0, 0]])
|
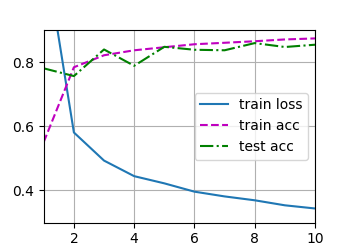
利用现有框架复现暂退法
code
import torch
from torch import nn
from d2l import torch as d2l
"""利用深度学习框架高级api实现暂退法,请先阅读dropout_self.py"""
def init_weights(model):
"""
初始化权重,针对此例
:param model: 传入模型
:return:
"""
if type(model) == nn.Linear:
nn.init.normal_(model.weight, 0, 0.01)
if __name__ == '__main__':
num_inputs, num_outputs, num_hiddens1, num_hiddens2 = 784, 10, 256, 256
drop_out1, drop_out2 = 0.2, 0.5
net = nn.Sequential(
nn.Flatten(),
nn.Linear(num_inputs, num_hiddens1),
nn.ReLU(),
nn.Dropout(drop_out1),
nn.Linear(num_hiddens1, num_hiddens2),
nn.ReLU(),
nn.Dropout(drop_out2),
nn.Linear(num_hiddens2, num_outputs)
)
net.apply(init_weights)
num_epochs, lr, batch_size = 10, 0.5, 256
train_iter, test_iter = d2l.load_data_fashion_mnist(batch_size)
loss = nn.CrossEntropyLoss(reduction='none')
trainer = torch.optim.SGD(net.parameters(), lr=lr)
d2l.train_ch3(net, train_iter, test_iter, loss, num_epochs, trainer)
d2l.plt.show()
|
output
前向传播、反向传播和计算图
详见3.14 正向传播、反向传播和计算图 - Dive-into-DL-PyTorch (tangshusen.me)
或5.3. Forward Propagation, Backward Propagation, and Computational Graphs — Dive into Deep Learning 1.0.3 documentation (d2l.ai)
数值稳定性和模型初始化
详见4.8. 数值稳定性和模型初始化 — 动手学深度学习 2.0.0 documentation (d2l.ai)
实操:预测房价
TBD


