写在前面

参考书籍

Aston Zhang, Zachary C. Lipton, Mu Li, Alexander J. Smola. Dive into Deep Learning. 2020.

简介 - Dive-into-DL-PyTorch (tangshusen.me)

卷积神经网络

source code: NJU-ymhui/DeepLearning: Deep Learning with pytorch (github.com)

use git to clone: https://github.com/NJU-ymhui/DeepLearning.git

/CNN

cross_correlation.py fill.py multi_pipe.py pool_layer.py LeNet.py

多层感知机的局限性

详见7.1. From Fully Connected Layers to Convolutions — Dive into Deep Learning 1.0.3 documentation (d2l.ai)

卷积

详见7.1. From Fully Connected Layers to Convolutions — Dive into Deep Learning 1.0.3 documentation (d2l.ai)

图像卷积

卷积神经网络主要用于探索图像数据,因此此处以图象为例

互相关运算

严格地讲,卷积层是不严谨的,因为它所表达的运算实际上是互相关运算,而不是卷积运算。在这种卷积层中,输入张量和核张量通过互相关运算得到输出张量。

理论部分详见7.2. Cross-Correlation Operation — Dive into Deep Learning 1.0.3 documentation (d2l.ai)

code

import torch
from d2l import torch as d2l


def corr2d(X, K):
"""计算二维互相关运算"""
h, w = K.shape
Y = torch.zeros((X.shape[0] - h + 1, X.shape[1] - w + 1))
for i in range(Y.shape[0]):
for j in range(Y.shape[1]):
Y[i, j] = (X[i:i + h, j:j + w] * K).sum()
return Y


if __name__ == "__main__":
X = torch.tensor([[0.0, 1.0, 2.0], [3.0, 4.0, 5.0], [6.0, 7.0, 8.0]])
K = torch.tensor([[0.0, 1.0], [2.0, 3.0]])
print(corr2d(X, K))

output

tensor([[19., 25.],
[37., 43.]])

卷积层

卷积层对输入和卷积核权重进行互相关运算,并在添加标量偏置之后产生输出。所以卷积层中两个被训练的参数是卷积核权重和标量偏置。因此当我们初始化参数时,要对卷积核权重进行随机初始化,同时给偏置一个初值。

code

class Conv2D(nn.Module):
def __init__(self, kernel_size):
# kernel_size (tuple): 卷积核的大小,用于初始化权重矩阵。
super().__init__()
self.weight = nn.Parameter(torch.rand(kernel_size)) # 随机初始化权重
self.bias = nn.Parameter(torch.zeros(1)) # 为偏置赋初值

def forward(self, x):
# 应用卷积操作并加上偏置项
return corr2d(x, self.weight) + self.bias

边缘检测

下面介绍卷积层的一个简单应用:通过找到像素变化的位置,检测图像中不同颜色的边缘。

code

# 边缘检测
X = torch.ones((6, 8)) # 构造一个6 * 8的黑白像素图象,0黑1白
X[:, 2:6] = 0
print(X)
# 接下来构造一个长为1宽为2的卷积核,当相邻元素相同时,输出0
K = torch.tensor([[1.0, -1.0]]) # [1, 0] * K = 1, [0, 1] * K = -1
# 执行互相关运算
Y = corr2d(X, K)
# 输出中1为白色到黑色的边缘, -1为黑色到白色的边缘
print(Y) # 根据输出发现这种方法只能检测出垂直边缘,水平边缘消失了
# 更直观的感受一下
print(corr2d(X.T, K))

output

tensor([[1., 1., 0., 0., 0., 0., 1., 1.],
[1., 1., 0., 0., 0., 0., 1., 1.],
[1., 1., 0., 0., 0., 0., 1., 1.],
[1., 1., 0., 0., 0., 0., 1., 1.],
[1., 1., 0., 0., 0., 0., 1., 1.],
[1., 1., 0., 0., 0., 0., 1., 1.]])
tensor([[ 0., 1., 0., 0., 0., -1., 0.],
[ 0., 1., 0., 0., 0., -1., 0.],
[ 0., 1., 0., 0., 0., -1., 0.],
[ 0., 1., 0., 0., 0., -1., 0.],
[ 0., 1., 0., 0., 0., -1., 0.],
[ 0., 1., 0., 0., 0., -1., 0.]])
tensor([[0., 0., 0., 0., 0.],
[0., 0., 0., 0., 0.],
[0., 0., 0., 0., 0.],
[0., 0., 0., 0., 0.],
[0., 0., 0., 0., 0.],
[0., 0., 0., 0., 0.],
[0., 0., 0., 0., 0.],
[0., 0., 0., 0., 0.]])

学习卷积核

如果我们只需寻找黑白边缘,那么以上[1, -1]的边缘检测器足以。然而,当有了更复杂数值的卷积核,或者连续的卷积层时,我们不可能手动设计滤波器,因此考虑通过学习由X生成Y的卷积核

现在我们尝试仅通过查看"输入-输出"对来学习由X生成Y的卷积核

code

# 构造一个二维卷积层,它有1个输出通道和形状为(1, 2)的卷积核
conv2d = nn.Conv2d(1, 1, kernel_size=(1, 2), bias=False) # 卷积核权重存在这里
# 这个二维卷积层使用四维输入和输出格式(批量大小、通道、高、宽)
# 批量大小和通道都为1
X = X.reshape((1, 1, 6, 8))
Y = Y.reshape((1, 1, 6, 7))
# 准备训练
num_epochs, lr = 10, 0.03
print("before training:")
print("weight:", conv2d.weight.data.reshape((1, 2)))
for i in range(num_epochs):
Y_hat = conv2d(X)
l = (Y - Y_hat) ** 2
conv2d.zero_grad()
l.sum().backward() # 先梯度归零,再反向传播
# 更新权重
conv2d.weight.data[:] -= lr * conv2d.weight.grad
print(f'epoch {i + 1}, loss {l.sum():.5f}') # 可视化损失变化

# 看一下迭代后的权重如何
print("after training:")
print("weight:", conv2d.weight.data.reshape((1, 2)))

output

before training:
weight: tensor([[0.1613, 0.4069]])
epoch 1, loss 19.97194
epoch 2, loss 9.29642
epoch 3, loss 4.52200
epoch 4, loss 2.30929
epoch 5, loss 1.23841
epoch 6, loss 0.69447
epoch 7, loss 0.40428
epoch 8, loss 0.24228
epoch 9, loss 0.14831
epoch 10, loss 0.09216
after training:
weight: tensor([[ 1.0176, -0.9565]])

填充和步幅

在应用多层卷积时,我们常常丢失边缘像素;解决这个问题的简单办法即为填充

填充

原理部分详见7.3. Padding — Dive into Deep Learning 1.0.3 documentation (d2l.ai)

code

import torch
from torch import nn


# 定义一个计算卷积层的函数
# 为函数初始化卷积层权重,并对输入和输出提高和缩减相应的维度
def comp_conv2d(conv2d, X):
# (1, 1)表示批量大小和通道数都是1
X = X.reshape((1, 1) + X.shape)
Y = conv2d(X)
# 省略前两个维度批量大小和通道数
return Y.reshape(Y.shape[2:])


if __name__ == "__main__":
# 这里每边都填充了1行或1列,因此共添加2行或2列
conv2d = nn.Conv2d(1, 1, kernel_size=3, padding=1)
X = torch.rand(size=(8, 8))
Y = comp_conv2d(conv2d, X)
print(Y.shape)
conv2d = nn.Conv2d(1, 1, kernel_size=(5, 3), padding=(2, 1))
Y = comp_conv2d(conv2d, X)
print(Y.shape)

output

torch.Size([8, 8])
torch.Size([8, 8])

步幅

7.3. Stride — Dive into Deep Learning 1.0.3 documentation (d2l.ai)

code

# 步幅 2
conv2d = nn.Conv2d(1, 1, kernel_size=3, padding=1, stride=2)
Y = comp_conv2d(conv2d, X)
print(Y.shape)
conv2d = nn.Conv2d(1, 1, kernel_size=(3, 5), padding=(0, 1), stride=(3, 4))
Y = comp_conv2d(conv2d, X)
print(Y.shape)

output

torch.Size([4, 4])
torch.Size([2, 2])

多输入多输出通道

之前我们一直在讨论单通道时的情况,但实际情况往往是更加复杂的。例如彩色图像往往采用标准RGB通道来代表红、绿、蓝,这就已经有三个通道了。

多输入通道

当输入包含多个通道时,需要构造一个与输入数据具有相同输入通道数的卷积核,以便与输入数据进行互相关运算。

code

import torch
from torch import nn
from d2l import torch as d2l


# 多输入
def corr2d_multi_in(X, K):
# 先遍历X和K的第0个维度(通道维度),再把它们加在一起
return sum(d2l.corr2d(x, k) for x, k in zip(X, K))


if __name__ == "__main__":
X = torch.tensor([[[0.0, 1.0, 2.0], [3.0, 4.0, 5.0], [6.0, 7.0, 8.0]],
[[1.0, 2.0, 3.0], [4.0, 5.0, 6.0], [7.0, 8.0, 9.0]]])
K = torch.tensor([[[0.0, 1.0], [2.0, 3.0]], [[1.0, 2.0], [3.0, 4.0]]])
print(corr2d_multi_in(X, K))

output

tensor([[ 56.,  72.],
[104., 120.]])

多输出通道

目前尽管我们已经实现了多输入通道,但是输出通道还是只有一个。在当下的神经网络架构中,随着神经网络层数的加深,我们常会增加输出通道的维数,通过减少空间分辨率以获得更大的通道深度。

code

import torch
from torch import nn
from d2l import torch as d2l


# 多输入
def corr2d_multi_in(X, K):
# 先遍历X和K的第0个维度(通道维度),再把它们加在一起
return sum(d2l.corr2d(x, k) for x, k in zip(X, K))


# 多输出
def corr2d_multi_in_out(X, K):
# 遍历K的第0个维度,每次都把一个卷积层应用于X(执行互相关运算),然后把结果收集起来
return torch.stack([corr2d_multi_in(X, k) for k in K], 0)


if __name__ == "__main__":
print("multi in:")
X = torch.tensor([[[0.0, 1.0, 2.0], [3.0, 4.0, 5.0], [6.0, 7.0, 8.0]],
[[1.0, 2.0, 3.0], [4.0, 5.0, 6.0], [7.0, 8.0, 9.0]]])
K = torch.tensor([[[0.0, 1.0], [2.0, 3.0]], [[1.0, 2.0], [3.0, 4.0]]])
print(corr2d_multi_in(X, K))

print("multi out:")
K = torch.stack((K, K + 1, K + 2), 0)
print(K.shape)
print(corr2d_multi_in_out(X, K))

output

multi in:
tensor([[ 56., 72.],
[104., 120.]])
multi out:
torch.Size([3, 2, 2, 2])
tensor([[[ 56., 72.],
[104., 120.]],

[[ 76., 100.],
[148., 172.]],

[[ 96., 128.],
[192., 224.]]])

1 * 1卷积层

作用详见7.4. Multiple Input and Multiple Output Channels — Dive into Deep Learning 1.0.3 documentation (d2l.ai)

code

import torch
from torch import nn
from d2l import torch as d2l


# 多输入
def corr2d_multi_in(X, K):
# 先遍历X和K的第0个维度(通道维度),再把它们加在一起
return sum(d2l.corr2d(x, k) for x, k in zip(X, K))


# 多输出
def corr2d_multi_in_out(X, K):
# 遍历K的第0个维度,每次都把一个卷积层应用于X(执行互相关运算),然后把结果收集起来
return torch.stack([corr2d_multi_in(X, k) for k in K], 0)


# 1 * 1卷积
def corr2d_multi_in_out_1x1(X, K):
c_i, h, w = X.shape
c_o = K.shape[0]
X = X.reshape((c_i, h * w))
K = K.reshape((c_o, c_i))
# 全连接层的矩阵乘法
Y = torch.matmul(K, X)
return Y.reshape((c_o, h, w))


if __name__ == "__main__":
print("1 * 1 correlation:")
X = torch.normal(0, 1, (3, 3, 3))
K = torch.normal(0, 1, (2, 3, 1, 1))
Y1 = corr2d_multi_in_out_1x1(X, K)
Y2 = corr2d_multi_in_out(X, K)
assert float(torch.abs(Y1 - Y2).sum()) < 1e-6
print(float(torch.abs(Y1 - Y2).sum()))

output

1 * 1 correlation:
0.0

汇聚层

通常当我们处理图像时,我们希望逐渐降低隐藏表示的空间分辨率、聚集信息,这样随着我们在神经网络中层叠的上升,每个神经元对其敏感的感受野(输入)就越大。

而机器学习任务通常会跟全局图像的问题有关(例如,“图像是否包含一只猫呢?”),所以最后一层的神经元应该对整个输入的全局敏感通过逐渐聚合信息,生成越来越粗糙的映射,最终实现学习全局表示的目标,同时将卷积图层的所有优势保留在中间层

原理部分见7.5. Pooling — Dive into Deep Learning 1.0.3 documentation (d2l.ai)

code

import torch
from torch import nn
from d2l import torch as d2l


# 最大汇聚层 or 平均汇聚层
def pool2d(X, pool_size, mode='max'):
"""汇聚层实现,mode选择最大/平均"""
p_h , p_w = pool_size
Y = torch.zeros((X.shape[0] - p_h + 1, X.shape[1] - p_w + 1))
for i in range(Y.shape[0]):
for j in range(Y.shape[1]):
if mode == 'max':
Y[i, j] = X[i: i + p_h, j: j + p_w].max()
elif mode == 'avg':
Y[i, j] = X[i: i + p_h, j: j + p_w].mean()
return Y


if __name__ == "__main__":
X = torch.tensor([[0.0, 1.0, 2.0], [3.0, 4.0, 5.0], [6.0, 7.0, 8.0]])
print(pool2d(X, (2, 2))) # 输出最大汇聚层
print(pool2d(X, (2, 2), 'avg')) # 输出平均汇聚层

# 填充和步幅
X = torch.arange(16, dtype=torch.float32).reshape((1, 1, 4, 4))
pool2d = nn.MaxPool2d(3)
print(pool2d(X))
pool2d = nn.MaxPool2d(3, padding=1, stride=2)
print(pool2d(X))
pool2d = nn.MaxPool2d((2, 3), stride=(2, 3), padding=(0, 1))
print(pool2d(X))

# 多个通道
X = torch.cat((X, X + 1), 1)
pool2d = nn.MaxPool2d(3, padding=1, stride=2)
print(pool2d(X))

output

tensor([[4., 5.],
[7., 8.]])
tensor([[2., 3.],
[5., 6.]])
tensor([[[[10.]]]])
tensor([[[[ 5., 7.],
[13., 15.]]]])
tensor([[[[ 5., 7.],
[13., 15.]]]])
tensor([[[[ 5., 7.],
[13., 15.]],

[[ 6., 8.],
[14., 16.]]]])

LeNet

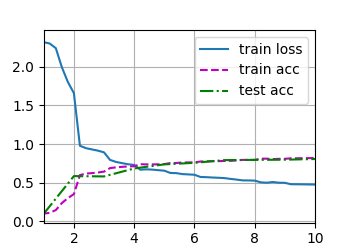
到目前,我们已经掌握了构建一个完整卷积神经网络的所需组件。之前在处理Fashion-MNIST数据集时,我们使用了softmax回归和多层感知机模型,但这样需要将28 * 28的图像展平为一个784维的向量,破坏了其空间结构。而现在,通过卷积层,我们可以保留图像中的空间结构。

LeNet是一种卷积神经网络之一,是一种监督学习。

主要有两部分组成:

  • 卷积编码器:由两个卷积层组成
  • 全连接层密集块:由三个全连接层组成

code

import torch
from torch import nn
from d2l import torch as d2l


# 模型评估
def evaluate_accuracy_gpu(net, data_iter, device=None):
"""使用GPU计算模型在数据集上的精度"""
if isinstance(net, nn.Module):
net.eval()
if not device:
device = next(iter(net.parameters())).device
# 准确预测的数量, 总预测的数量
metric = d2l.Accumulator(2)
with torch.no_grad():
for X, y in data_iter:
if isinstance(X, list):
# Bert微调所需
X = [x.to(device) for x in X]
else:
X = X.to(device)
y = y.to(device)
metric.add(d2l.accuracy(net(X), y), y.numel())
return metric[0] / metric[1]


# 训练模型,使用Xavier随机初始化模型参数,使用交叉熵损失函数和小批量随机梯度下降
def train_ch6(net, train_iter, test_iter, num_epochs, lr, device):
"""使用GPU训练模型"""
def init_weights(m):
if type(m) == nn.Linear or type(m) == nn.Conv2d:
nn.init.xavier_uniform_(m.weight)
net.apply(init_weights)
print("training on", device)
net.to(device)
optimizer = torch.optim.SGD(net.parameters(), lr=lr)
loss = nn.CrossEntropyLoss()
animator = d2l.Animator(xlabel='epoch', xlim=[1, num_epochs],
legend=['train loss', 'train acc', 'test acc'])
timer, num_batches = d2l.Timer(), len(train_iter)
for epoch in range(num_epochs):
# 训练损失之和, 训练准确率之和, 样本数
metric = d2l.Accumulator(3)
net.train()
for i, (X, y) in enumerate(train_iter):
timer.start()
optimizer.zero_grad()
X, y = X.to(device), y.to(device)
y_hat = net(X)
l = loss(y_hat, y)
l.backward()
optimizer.step()
with torch.no_grad():
metric.add(l * X.shape[0], d2l.accuracy(y_hat, y), X.shape[0])
timer.stop()
train_l = metric[0] / metric[2]
train_acc = metric[1] / metric[2]
if (i + 1) % (num_batches // 5) == 0 or i == num_batches - 1:
animator.add(epoch + (i + 1) / num_batches,
(train_l, train_acc, None))
test_acc = evaluate_accuracy_gpu(net, test_iter)
animator.add(epoch + 1, (None, None, test_acc))
print(f'loss {train_l:.3f}, train acc {train_acc:.3f}, test acc {test_acc:.3f}')
print(f'{metric[2] * num_epochs / timer.sum(): .1f} examples/sec '
f'on {str(device)}')
d2l.plt.show() # 可视化结果


if __name__ == "__main__":
# LeNet卷积神经网络
net = nn.Sequential(
nn.Conv2d(1, 6, kernel_size=5, padding=2),
nn.Sigmoid(),
nn.AvgPool2d(kernel_size=2, stride=2),
nn.Conv2d(6, 16, kernel_size=5),
nn.Sigmoid(),
nn.AvgPool2d(kernel_size=2, stride=2),
nn.Flatten(),
nn.Linear(16 * 5 * 5, 120),
nn.Sigmoid(),
nn.Linear(120, 84),
nn.Sigmoid(),
nn.Linear(84, 10)
)
X = torch.rand(size=(1, 1, 28, 28), dtype=torch.float32)
for layer in net:
X = layer(X)
print(layer.__class__.__name__, "output shape: ", X.shape)

# 模型训练
batch_size = 256
train_iter, test_iter = d2l.load_data_fashion_mnist(batch_size=batch_size)
lr, num_epochs = 0.9, 10
train_ch6(net, train_iter, test_iter, num_epochs, lr, d2l.try_gpu())

output

Conv2d output shape:  torch.Size([1, 6, 28, 28])
Sigmoid output shape: torch.Size([1, 6, 28, 28])
AvgPool2d output shape: torch.Size([1, 6, 14, 14])
Conv2d output shape: torch.Size([1, 16, 10, 10])
Sigmoid output shape: torch.Size([1, 16, 10, 10])
AvgPool2d output shape: torch.Size([1, 16, 5, 5])
Flatten output shape: torch.Size([1, 400])
Linear output shape: torch.Size([1, 120])
Sigmoid output shape: torch.Size([1, 120])
Linear output shape: torch.Size([1, 84])
Sigmoid output shape: torch.Size([1, 84])
Linear output shape: torch.Size([1, 10])
training on cpu
loss 0.477, train acc 0.820, test acc 0.807
7299.6 examples/sec on cpu

(•‿•)